
High Protein Power Balls are no-bake energy bites that blend dates, nuts, and protein-packed mix-ins into a compact, satisfying snack. You should make them because they’re fast, nourishing, and wildly adaptable, with the kind of balanced sweetness and texture that keeps you reaching for one more. When I first tasted a batch like this, I was struck by how the exterior had just enough grip from coconut or cocoa, while the center stayed fudgy and aromatic. They’re the sort of snack that feels equally at home in a chef’s prep box or a busy weeknight kitchen.
Why I Love This Recipe
What I love most about High Protein Power Balls is how they echo snack traditions from so many food cultures while staying completely modern. They remind me of the date-rich confections found across the Middle East and North Africa, where fruit, nuts, and spice are layered into something both wholesome and luxurious. From a professional standpoint, the technique is brilliant: you’re using natural stickiness from dates or nut butter to bind everything without baking, then shaping by hand for a rustic, artisan finish. I still remember rolling my first batch after a long service, the kitchen quiet except for the soft clink of the food processor and the scent of toasted almonds. They felt like edible proof that simple ingredients can be transformed with a little precision and care.
What You Need From Your Kitchen
Food processor
Needed to break down dates, nuts, and add-ins into a cohesive, moldable mixture with the right chew
Measuring cups and spoons
Essential for balancing protein powder, seeds, and sweeteners so the texture stays tender, not dry
Small cookie scoop
Helps portion each ball evenly for a polished, professional look and consistent bite size
Parchment-lined tray
Prevents sticking while the balls chill and set, especially if the mixture is soft or oily
Mixing bowl
Useful for folding in delicate coatings like coconut or cacao nibs without crushing the texture
Perfect Pairings
Cold brew coffee
Its roasty bitterness cuts through the natural sweetness and highlights the nutty, cocoa-like notes
Greek yogurt with berries
A creamy, tangy side that turns these bites into a balanced breakfast or post-workout snack
Herbal mint tea
The fresh, cooling aroma keeps the flavors bright and makes the snack feel elegant
Afternoon picnic spread
Perfect for lunchboxes, road trips, or a quick energy boost between activities
Dark chocolate drizzle
Adds a dessert-like finish for entertaining or a healthier sweet plate after dinner
Pro Tips
- Pulse oats first if you want a finer, more cohesive texture. Breaking them down slightly helps the protein mixture bind like a pâté en croûte filling, giving the balls a smoother, less crumbly bite.
- Use a cookie scoop or small melon baller for portioning. Uniform size matters because it creates even chilling, consistent texture, and a polished finish that looks as appealing as it tastes.
- Chill the mixture before rolling if your kitchen runs warm. Cold fat in nut butter firms up, which prevents the balls from flattening and keeps that satisfying, dense energy-bite chew.
- Toast coconut, seeds, or nuts before coating when possible. A quick toast deepens aroma and adds a nutty, caramelized edge that makes these simple bites taste far more luxurious.
- Balance sweetness with a pinch of salt. That tiny savory note sharpens the vanilla, chocolate, or citrus flavors in High Protein Power Balls and keeps the finish from tasting flat.
🍳 Your Cooking Progress
Ingredients Gathered
0/10 CompleteCooking Steps
0/7 CompleteRecipe Mastery
0% CompleteHigh Protein Power Balls
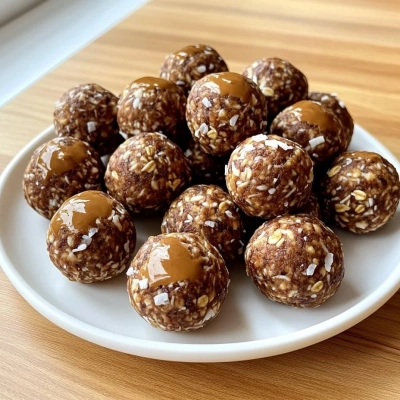
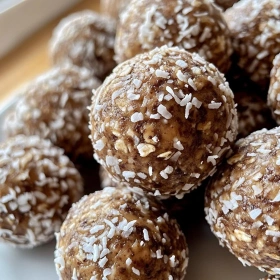
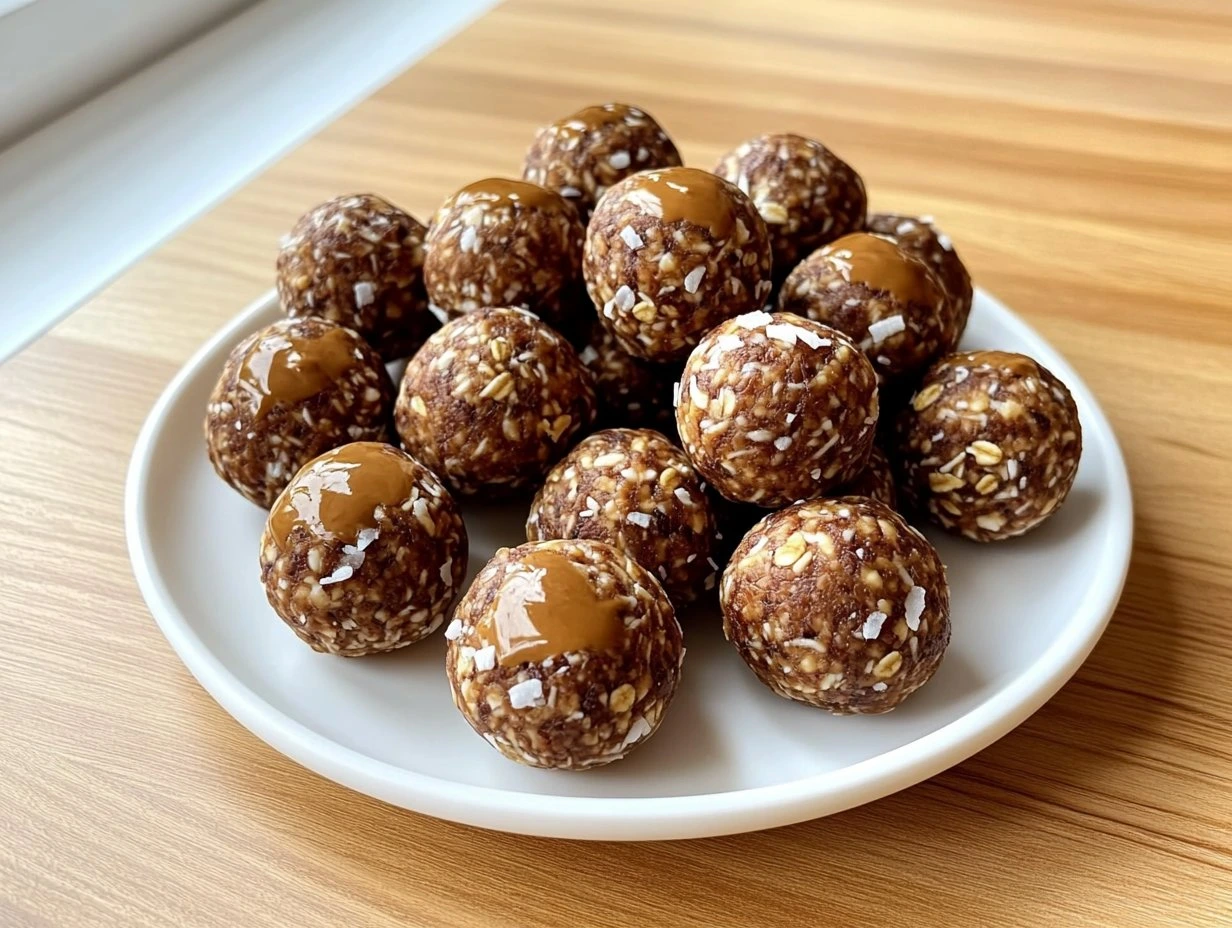
High Protein Power Balls deliver a velvety, truffle-like bite with toasted nut butter richness and just enough sweetness to feel indulgent. The no-bake method keeps them simple, while rolling them in cocoa, coconut, or crushed nuts adds texture and visual flair.
Ingredients
💡 Click on ingredients to check them off!
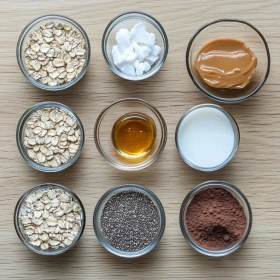
- 1 cup old-fashioned rolled oats
- 1 cup vanilla whey protein powder
- 1/2 cup natural peanut butter
- 1/3 cup honey
- 2 tablespoons chia seeds
- 1 tablespoon unsweetened cocoa powder
- 1 teaspoon pure vanilla extract
- 1/4 teaspoon fine sea salt
- 2 tablespoons milk, plus more as needed
- 2 tablespoons shredded coconut, for rolling
Instructions
💡 Click on steps to mark as complete!
-
1Combine the dry baseIn a medium bowl, stir together the oats, protein powder, chia seeds, cocoa powder, and sea salt until evenly distributed. This prevents pockets of bitterness or clumps of powder, giving the finished balls a cohesive, clean flavor and a pleasantly speckled texture.
-
2Build the binderAdd the peanut butter, honey, vanilla extract, and 2 tablespoons milk to the dry ingredients. Mix with a spatula first, then your hands if needed. The mixture should feel thick, slightly tacky, and moldable, not wet; add a splash more milk only if it seems crumbly.
-
3Rest for better hydrationLet the mixture sit for 5 minutes so the oats and chia seeds absorb moisture. This small pause is crucial for proper binding and a more tender bite. You’ll notice the mass tighten slightly, becoming easier to portion and roll without cracking at the edges.
-
4Portion with consistencyScoop the mixture into 1-inch portions using a small cookie scoop or tablespoon. Uniform size ensures even texture and a polished presentation. If the dough sticks, lightly dampen your hands with water; too much moisture will dull the exterior and make rolling less neat.
-
5Roll and finishRoll each portion between your palms into smooth spheres, then coat some in shredded coconut if desired. For the most even finish, work quickly and use gentle pressure. The surface should look glossy from the nut butter, with a rustic, homemade grain texture underneath.
-
6Chill to setArrange the power balls on a parchment-lined tray and refrigerate for at least 20 minutes. Chilling firms the fats and helps the flavors marry, especially the honey, cocoa, and vanilla. After setting, they’ll hold their shape with a satisfying, truffle-like density.
-
7Serve and store smartEnjoy chilled for the best chewy-yet-firm texture, or pack them for a post-workout snack. Store in an airtight container in the refrigerator for up to 1 week. For longer storage, freeze and thaw briefly before eating so the center stays pleasantly chewy.
Nutrition Facts (Per Serving)
Chef's Notes
- Store High Protein Power Balls in an airtight container in the refrigerator for up to 7 days. Their chewy texture stays pleasantly dense, and the flavors deepen as oats, nut butter, and protein powder meld together.
- Freeze the rolled balls on a parchment-lined tray first, then transfer to a freezer bag. This keeps them from sticking, so you can grab a few at a time without losing their glossy coating.
- If the mixture feels dry or crumbly, add milk, yogurt, or a teaspoon of nut butter until it clumps easily. The dough should feel tacky but still hold a clean, round shape.
- If the mixture is too soft to roll, chill it for 20 minutes before shaping. Protein powder, nut butter, and honey firm up beautifully once cold, making the balls neater and less sticky.
- For make-ahead prep, mix the base and refrigerate it overnight before rolling. The oats hydrate fully, giving the finished balls a more cohesive bite and a richer, almost truffle-like chew.
- Roll coconut- or cocoa-coated balls after chilling the mixture slightly so the exterior clings evenly. A cool surface helps the finish look polished and keeps the coating from turning patchy.