

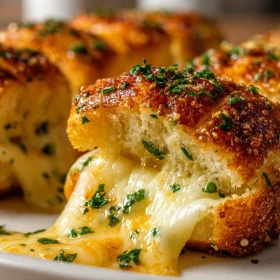
Hawaiian Roll Grilled Cheese Bites are a delightful twist on the classic sandwich, offering a sweet and savory experience. Make them for their irresistible combination of crispy exterior and gooey cheese interior. These bites are perfect for gatherings or a cozy night in, showcasing the versatility of Hawaiian rolls.
Why I Love This Recipe
I first encountered Hawaiian Roll Grilled Cheese Bites at a bustling food festival, where the aroma of melted cheese and toasted bread was irresistible. The sweetness of the Hawaiian rolls adds a unique twist, making each bite a harmonious blend of flavors. As a chef, I appreciate the simplicity and creativity of using these rolls to elevate a classic dish. The technique of achieving a perfectly golden crust while maintaining a gooey center is both an art and a science, making it a fascinating challenge. This dish evokes memories of shared laughter and warm gatherings, embodying the joy of comfort food with a gourmet touch.
What You Need From Your Kitchen
Non-stick skillet
Ensures even browning and prevents sticking
Sharp knife
Essential for cleanly slicing the rolls into bite-sized pieces
Pastry brush
Perfect for applying butter evenly for a golden crust
Spatula
Helps flip the bites without losing cheese
Cheese grater
Freshly grated cheese melts more evenly.
Perfect Pairings
Tomato Soup
Complements the cheesy richness with its tangy warmth
Crisp White Wine
Enhances the sweet and savory notes with its refreshing acidity
Pickled Vegetables
Adds a tangy crunch that contrasts the creamy cheese
Sparkling Water
Cleanses the palate between bites
Game Night
These bites are perfect for casual gatherings and fun occasions.

Pro Tips
- Use a mix of cheeses like cheddar and mozzarella for a balance of sharpness and gooey texture. This combination creates a delightful contrast in each bite.
- Butter the outside of the rolls generously before grilling. This ensures a golden, crispy crust that enhances the overall flavor and mouthfeel.
- Grill the bites over medium heat to allow the cheese to melt evenly without burning the bread. Patience here results in perfectly gooey centers.
- Add a pinch of garlic powder to the butter for an aromatic twist. This subtle addition elevates the flavor profile, making each bite more enticing.
🍳 Your Cooking Progress
Ingredients Gathered
0/10 CompleteCooking Steps
0/6 CompleteRecipe Mastery
0% CompleteHawaiian Roll Grilled Cheese Bites
These grilled cheese bites use Hawaiian rolls for a unique sweetness that complements the melted cheese. The key technique is achieving a perfect golden crust, enhancing the texture and flavor.
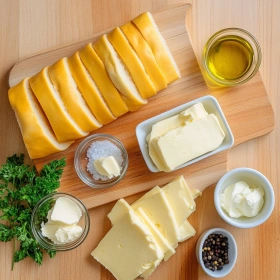
Ingredients
💡 Click on ingredients to check them off!
- 12 Hawaiian rolls
- 8 ounces cheddar cheese, sliced
- 4 ounces mozzarella cheese, sliced
- 3 tablespoons unsalted butter, softened
- 1 tablespoon garlic powder
- 1 teaspoon dried parsley
- 1/2 teaspoon sea salt
- 1/4 teaspoon black pepper
- 2 tablespoons olive oil
- 1 tablespoon Dijon mustard
Instructions
💡 Click on steps to mark as complete!
-
1Prepare RollsSlice Hawaiian rolls in half horizontally, keeping them attached. This creates a perfect base for the cheese filling.
-
2Mix ButterCombine softened butter, garlic powder, parsley, salt, and pepper. This aromatic blend will infuse the rolls with flavor.
-
3Assemble CheeseLayer cheddar and mozzarella between roll halves. Ensure even distribution for a gooey, melty center.
-
4Heat PanPreheat a skillet over medium heat with olive oil. This ensures a golden, crispy crust on the rolls.
-
5Grill BitesPlace assembled rolls in the skillet. Press gently with a spatula for even browning, about 3-4 minutes per side.
-
6Serve with SauceMix Dijon mustard with a touch of honey for a tangy dip. Serve bites warm, allowing the cheese to ooze delightfully.
Nutrition Facts (Per Serving)
Chef's Notes
- Store leftover Hawaiian Roll Grilled Cheese Bites in an airtight container in the fridge for up to 3 days. Reheat in a toaster oven for a crispy texture.
- For a make-ahead option, assemble the bites and freeze them on a baking sheet. Once frozen, transfer to a zip-top bag and store for up to a month.
- If you run out of Hawaiian rolls, substitute with brioche or challah for a similar sweetness and soft texture that complements the melted cheese.
- To prevent sogginess, allow the grilled cheese bites to cool on a wire rack after cooking. This ensures even airflow and maintains their crispy exterior.