

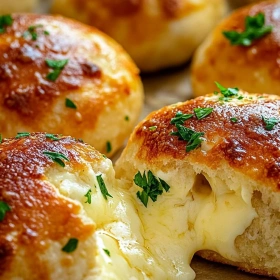
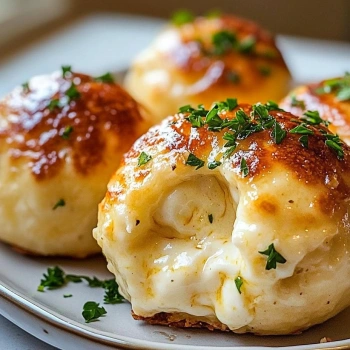
Gooey Garlic Butter Cheese Bombs are a must-try for any cheese enthusiast. These delectable bites feature a golden, buttery crust that gives way to a molten cheese center. The combination of garlic and butter creates an irresistible aroma that fills your kitchen, making these bombs a perfect appetizer or snack.
Why I Love This Recipe
I first encountered Gooey Garlic Butter Cheese Bombs at a bustling street market in Italy. The vendor's technique of infusing butter with fresh garlic before baking was a revelation. This dish evokes memories of that vibrant market, where the air was filled with the scent of freshly baked bread and sizzling cheese. As a chef, the simplicity of the ingredients combined with the bold flavors is what makes this recipe truly special. It's a testament to how a few quality ingredients can create something extraordinary.

What You Need From Your Kitchen
Pastry Brush
Essential for evenly spreading the garlic butter over the dough, ensuring a golden crust
Baking Sheet
Provides a flat surface for even baking, crucial for achieving the perfect texture
Mixing Bowl
Ideal for combining ingredients smoothly, ensuring the dough is well-prepared.
Perfect Pairings
Tomato Basil Soup
Complements the rich cheese with a refreshing acidity
Chardonnay
Its buttery notes enhance the garlic butter flavor
Caesar Salad
Offers a crisp contrast to the gooey cheese bombs
Family Gatherings
Perfect for sharing, these bombs are a crowd-pleaser
Game Night
Easy to serve and enjoy while watching your favorite team.
Pro Tips
- Brush the bombs with garlic butter before and after baking. This ensures a golden, crispy crust while infusing each bite with rich, buttery garlic flavor.
- Use room temperature dough for even baking. Cold dough can result in uneven cooking, leaving the center undercooked while the exterior browns too quickly.
- Allow the cheese to come to room temperature before stuffing. This helps it melt evenly, creating the signature gooey center that makes these bombs irresistible.
🍳 Your Cooking Progress
Ingredients Gathered
0/10 CompleteCooking Steps
0/6 CompleteRecipe Mastery
0% CompleteGooey Garlic Butter Cheese Bombs
The secret to Gooey Garlic Butter Cheese Bombs lies in the garlic-infused butter that envelops the cheese. This technique ensures each bite is bursting with flavor and a luscious, molten center.
Ingredients
💡 Click on ingredients to check them off!
- 2 cups all-purpose flour
- 1 tablespoon sugar
- 1 teaspoon salt
- 1 tablespoon baking powder
- 1/2 cup unsalted butter, melted
- 1 cup whole milk
- 2 cups shredded mozzarella cheese
- 4 cloves garlic, minced
- 2 tablespoons fresh parsley, chopped
- 1/4 cup grated Parmesan cheese
Instructions
💡 Click on steps to mark as complete!
-
1Prepare the DoughIn a large bowl, whisk together flour, sugar, salt, and baking powder. Gradually add melted butter and milk, stirring until a soft dough forms.
-
2Shape the BombsDivide the dough into 12 equal pieces. Flatten each piece and place a tablespoon of mozzarella in the center. Seal the edges to form a ball.
-
3Infuse with GarlicIn a small pan, sauté minced garlic in remaining butter until fragrant. Brush the garlic butter over each dough ball generously.
-
4Bake to PerfectionPreheat the oven to 375°F (190°C). Arrange the balls on a baking sheet lined with parchment paper. Bake for 15-20 minutes until golden brown.
-
5Add Finishing TouchesSprinkle freshly grated Parmesan and chopped parsley over the warm cheese bombs for an aromatic finish.
-
6Serve and EnjoyAllow to cool slightly before serving. Enjoy the gooey, cheesy center with a burst of garlic flavor in every bite.
Nutrition Facts (Per Serving)
Chef's Notes
- Store Gooey Garlic Butter Cheese Bombs in an airtight container in the fridge for up to three days. Reheat in the oven to maintain their crisp exterior and gooey center.
- To freeze, place uncooked bombs on a baking sheet and freeze until solid. Transfer to a freezer bag. Bake from frozen, adding a few extra minutes to the cooking time.
- Substitute mozzarella with gouda for a smokier flavor. The cheese should be firm to ensure it melts perfectly without leaking out during baking.
- Prepare the garlic butter mixture in advance and store in the fridge. This allows the flavors to meld, enhancing the aromatic garlic notes in the final dish.