
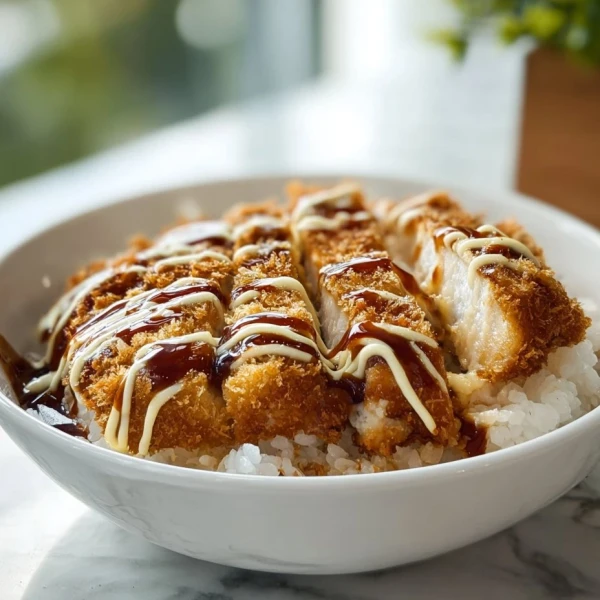
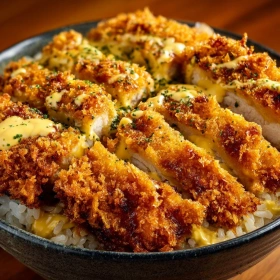
Crispy Japanese Katsu Bowl is a must-try for its perfect blend of textures and flavors. This dish features golden, panko-crusted cutlets atop fluffy rice, drizzled with savory tonkatsu sauce. As a chef, discovering this dish was a revelation; the contrast of the crispy exterior with the tender meat inside is culinary magic. The umami-rich sauce ties everything together, making it a dish that excites both the palate and the soul.
Why I Love This Recipe
The Crispy Japanese Katsu Bowl is a culinary treasure from Japan that I fell in love with during a visit to Tokyo. The art of achieving the perfect panko crust is a skill that demands respect. Watching the locals prepare it with such precision was inspiring. The memory of the first bite, the crunch echoing in my ears, and the rich, tangy sauce enveloping my taste buds is unforgettable. As a professional chef, the balance of flavors and textures in this dish is fascinating. It’s a reminder of how simplicity, when executed with care, can create something extraordinary.
What You Need From Your Kitchen
Panko Breadcrumbs
Essential for achieving the signature crispy texture of the katsu.
Deep Fryer
Ensures even cooking and perfect golden crust.
Sharp Chef’s Knife
For precise slicing of the cutlets, crucial for even cooking.
Rice Cooker
Ideal for preparing perfectly fluffy rice to accompany the katsu.
Whisk
To blend the tonkatsu sauce smoothly, ensuring a perfect consistency.
Perfect Pairings
Sake
Complements the umami flavors of the katsu with its subtle sweetness.
Miso Soup
A warm, comforting side that enhances the overall Japanese dining experience.
Pickled Ginger
Adds a refreshing contrast and cleanses the palate between bites.
Green Tea
Its earthy notes balance the richness of the dish.
Japanese Cucumber Salad
Provides a crisp, refreshing counterpoint to the fried katsu.

Pro Tips
- Pound the chicken to an even thickness for uniform cooking. This ensures a juicy interior and a perfectly crispy crust.
- Use Panko breadcrumbs for a light, airy texture. Their larger size creates a delightful crunch that elevates the dish.
- Double-fry the katsu for extra crispiness. The first fry cooks the chicken, and the second fry crisps the coating beautifully.
- Let the fried katsu rest on a wire rack instead of paper towels. This prevents the bottom from becoming soggy.
🍳 Your Cooking Progress
Ingredients Gathered
0/12 CompleteCooking Steps
0/6 CompleteRecipe Mastery
0% CompleteCrispy Japanese Katsu Bowl Delight
What sets this Crispy Japanese Katsu Bowl apart is the meticulous breading technique, ensuring each bite is a symphony of texture. The homemade tonkatsu sauce adds a tangy depth.
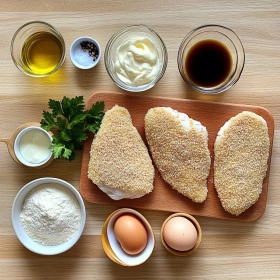
Ingredients
💡 Click on ingredients to check them off!
- 2 boneless chicken breasts
- 1 cup panko breadcrumbs
- 1/2 cup all-purpose flour
- 2 large eggs, beaten
- 1/4 cup vegetable oil
- 1 cup cooked Japanese rice
- 2 tablespoons tonkatsu sauce
- 1 tablespoon mayonnaise
- 1 teaspoon soy sauce
- 1/2 teaspoon salt
- 1/4 teaspoon black pepper
- 1 tablespoon chopped parsley
Instructions
💡 Click on steps to mark as complete!
-
1Prepare ChickenSeason chicken breasts with salt and pepper. Dredge in flour, dip in beaten eggs, and coat with panko for a crispy texture.
-
2Heat OilIn a skillet, heat vegetable oil over medium heat. Ensure oil is hot enough to sizzle a breadcrumb for perfect frying.
-
3Fry ChickenFry chicken until golden brown and cooked through, about 4-5 minutes per side. Drain on paper towels to remove excess oil.
-
4Cook RicePrepare Japanese rice according to package instructions. Fluff with a fork for a light, airy texture.
-
5Make SauceMix tonkatsu sauce, mayonnaise, and soy sauce in a bowl. Adjust seasoning to taste for a balanced flavor.
-
6Assemble BowlSlice chicken and place over rice. Drizzle with sauce and garnish with parsley for a fresh finish.
Nutrition Facts (Per Serving)
Chef's Notes
- Store leftover katsu in an airtight container in the fridge for up to 3 days. Reheat in the oven to maintain crispiness.
- Substitute chicken with tofu for a vegetarian version. Press tofu to remove excess moisture before breading for best results.
- Prepare the tonkatsu sauce ahead of time and refrigerate. It develops deeper flavors after a day or two.
- Freeze breaded, uncooked katsu on a baking sheet. Once frozen, transfer to a bag for up to a month. Fry directly from frozen.