
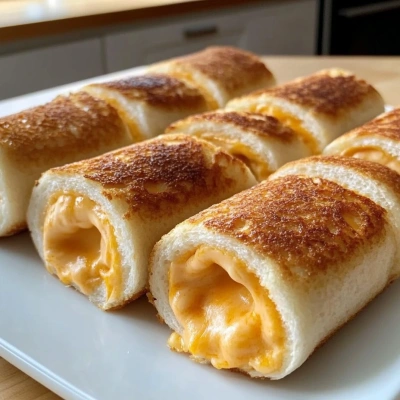
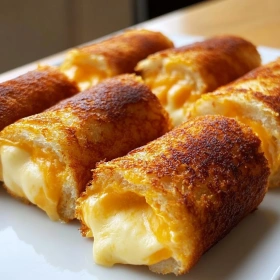
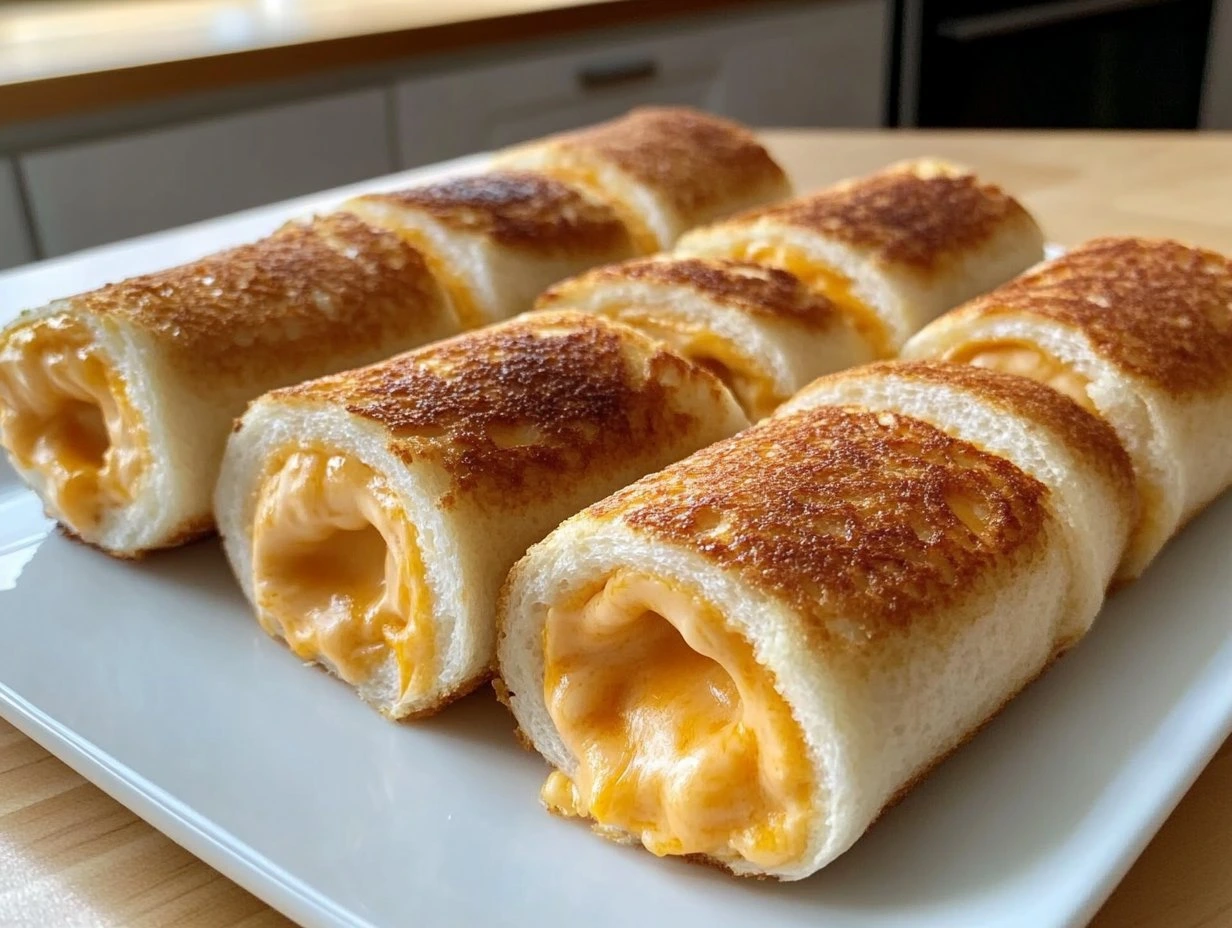
Crispy Grilled Cheese Roll Ups are exactly what they sound like: buttery, golden spirals of bread wrapped around molten cheese, crisped in a hot skillet until the outside shatters softly and the inside turns luxuriously gooey. I make these because they transform a childhood favorite into a smarter, more textural bite with real restaurant-level charm. The aroma of browning butter and toasted bread alone is enough to pull everyone into the kitchen. They’re simple, deeply satisfying, and the kind of snack or lunch that feels both nostalgic and a little bit clever.
Why I Love This Recipe
What I love most about this dish is how it captures the universal language of melted cheese while still feeling inventive. In kitchens from diner counters to home tables, grilled cheese is comfort—but rolling it into tight little cylinders gives it a playful, almost tapas-style elegance. The technique is beautifully practical: flatten the bread, seal in the cheese, and let the skillet create that bronzed, crisp exterior. It reminds me of late-afternoon cooking sessions when the pan hissed, the butter nut-browned at the edges, and the first bite revealed a lava-like center. For a professional cook, it’s a lesson in contrast: crunch against creaminess, simplicity against precision, and childhood memory against refined technique.
What You Need From Your Kitchen
Rolling pin
Essential for flattening the bread so it rolls tightly without tearing, creating a compact spiral that seals in the cheese
Nonstick skillet or cast-iron pan
Gives the roll ups an even, deeply golden crust while preventing the bread from sticking as the cheese melts
Spatula
Helps turn the rolls carefully so they brown on all sides without spilling the filling
Pastry brush
Useful for applying butter evenly across the bread for a uniform, crisp finish
Perfect Pairings
Tomato basil soup
Its bright acidity cuts through the rich, melted cheese and turns these roll ups into a classic comfort meal
Pickle spears
The sharp, briny crunch cleanses the palate between bites and balances the buttery bread
Light lager or sparkling apple cider
Both offer lively carbonation that refreshes the palate and keeps the dish from feeling too heavy
Simple green salad with lemon vinaigrette
A crisp, peppery side adds freshness and makes the meal feel complete for lunch or brunch
Movie night or game day platter
These are ideal as shareable finger food when you want something warm, nostalgic, and crowd-pleasing
Pro Tips
- Trim the bread crusts and roll it thin before filling; this compresses the crumb, helps the seam seal neatly, and creates that delicate, crisp exterior when toasted.
- Use a medium-low skillet and steady heat. High heat browns the bread before the cheese melts, while gentler heat gives you a deep golden crust and a fully gooey center.
- Butter the outside evenly, all the way to the edges. That thin, complete fat layer promotes even Maillard browning and prevents pale spots or scorched patches.
- Choose a melty cheese with good stretch, such as American, cheddar, mozzarella, or a blend. The right cheese gives the classic pull and keeps the filling creamy, not greasy.
- Press the roll ups lightly with a spatula as they cook. Gentle contact improves browning on all sides and helps the seams fuse so the rolls stay tight.
🍳 Your Cooking Progress
Ingredients Gathered
0/10 CompleteCooking Steps
0/7 CompleteRecipe Mastery
0% CompleteCrispy Grilled Cheese Roll Ups
Crispy Grilled Cheese Roll Ups turn humble sandwich bread into elegant, hand-held bites with a lacy sear and gooey center. Flattened, rolled, and skillet-finished, they deliver concentrated flavor, crisp edges, and a satisfying pull of melted cheese in every bite.
Ingredients
💡 Click on ingredients to check them off!
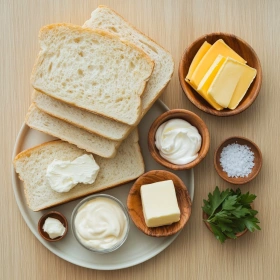
- 8 slices soft white sandwich bread, crusts removed
- 8 slices sharp cheddar cheese
- 2 tablespoons cream cheese, softened
- 2 tablespoons unsalted butter, softened
- 1 tablespoon mayonnaise
- 1/4 teaspoon garlic powder
- 1/4 teaspoon paprika
- 1/8 teaspoon fine sea salt
- 2 tablespoons grated Parmesan cheese
- 1 tablespoon chopped fresh parsley
Instructions
💡 Click on steps to mark as complete!
-
1Prepare the breadTrim the crusts from each slice, then use a rolling pin to flatten the bread into thin, flexible sheets. This helps the roll ups seal neatly and fry evenly, giving you that delicate, shatteringly crisp exterior without tearing.
-
2Build the fillingSpread a thin layer of cream cheese on each slice, then top with cheddar, keeping it centered and compact. A modest filling is key here, because overstuffing causes leakage and prevents the cheese from melting into a smooth, molten core.
-
3Roll with controlTightly roll each slice from one short side to the other, pressing the seam gently to seal. If needed, place the rolls seam-side down for a minute so the bread remembers its shape and stays intact during cooking.
-
4Season the outsideMix the softened butter with mayonnaise, garlic powder, paprika, salt, Parmesan, and parsley, then brush or spread a thin coat over the roll ups. The mayo encourages deep golden browning, while Parmesan adds savory, nutty complexity.
-
5Heat the pan properlyWarm a skillet over medium-low heat until the surface is steady and even, then arrange the roll ups seam-side down. Gentle heat is essential; it allows the bread to crisp gradually while the cheese inside turns glossy and fully melted.
-
6Turn for even colorCook, turning every 1 to 2 minutes, until all sides are evenly toasted and the roll ups feel lightly firm when lifted. Watch for a rich amber crust rather than dark browning, which signals balanced heat and better texture.
-
7Serve at onceTransfer the roll ups to a cutting board, let them rest briefly, then slice on a slight bias for a polished presentation. Serve immediately while the cheese is stretchy and aromatic, with the bread still audibly crisp.
Nutrition Facts (Per Serving)
Chef's Notes
- For the crispiest grilled cheese roll ups, assemble them just before cooking so the bread stays supple and seals tightly around the molten cheese center.
- If you need to hold them briefly, place the rolled sandwiches seam-side down on a parchment-lined tray and cover lightly; this helps prevent unrolling and drying out.
- These roll ups are best enjoyed fresh, but you can re-crisp leftovers in a skillet or air fryer instead of the microwave, which softens the golden crust.
- For make-ahead prep, flatten the bread and fill the rolls earlier in the day, then chill them wrapped well; cook cold for cleaner edges and less cheese leakage.
- If using a softer cheese blend, let the rolls rest a minute after cooking so the filling sets slightly; that keeps the first bite luscious, not runny.